How To Take Care Of Your Plants After Tissue Culture


Introduction
Tissue culture plants are grown in controlled lab environments, where their growth and development are carefully managed to ensure success. However, transitioning these plants to outdoor conditions requires extra caution. You can't simply take a tissue culture plant and plant it directly in soil outdoors.
Plants need to be gradually acclimatized before exposing them to the outside environment. This process begins by placing the plantlets in a specific medium inside a closed chamber. Over time, the chamber is slowly opened, allowing the plants to adjust to varying conditions. The gradual exposure ensures the plants adapt successfully and thrive once fully transferred to the outside environment

This process is known as hardening off or acclimatization or acclimation, an it helps plants adapt to the fluctuations in temperature, humidity, and light intensity found in natural settings.
This article covers the process of acclimation and how to carefully acclimate tissue-cultured or in vitro plants for a higher thriving success rate.
Stages of Plant Tissue Culture
Plant tissue culture is a propagation technique that involves introducing plant tissues into a nutrient solution under controlled lab conditions. This process consists of several stages, plant tissue culture involves a series of stages that are as follows:
1. Explant Cutting and Sterilization
This stage involves acquiring a healthy mother plant (a plant that you will be using for your tissue culture process). Take a healthy explant of your choice (whether it's a shoot, root, leaf, meristem, node, or seed). Wash the explant well-using water and sterilize it using chemicals such as bleach (or any other based on your experiments) for a period of time (based on your explant).
This step ensures a healthy, clean plant for the tissue culture process, reducing contamination and ensuring a higher success of plantlets developing into mature plants after the competition of the process.

2. Initiation stage
Introduce the surface sterilized explants (or plant tissues) into nutrient media under sterile conditions (preferably under a laminar flow hood). The media contains all the macro and micronutrients and vitamins explants need for their growth and development.
Keep the cultures in optimal lab conditions with controlled temperature, humidity, and light intensity to ensure a higher initiation success rate.
3. Multiplication stage
This stage involves transferring the grown explants obtained from the initiation stage to fresh media containing shooting hormones or cytokinin. The callus or plant tissue from the initiation stage starts regenerating shoots and leaves due to hormone.
Some culturists also prefer to subculture the plants from the multiplication stage in fresh media to multiply them into hundreds or thousands before introducing them to rooting conditions.
4. Rooting stage
At this stage, transfer plants with shoots to a fresh media containing auxin, also known as rooting hormone. Sometimes, there needs to be a perfect ratio of shooting and rooting hormones (auxin to cytokinin ratio) to ensure the regeneration of shoots and roots in in vitro plants.
5. Acclimation stage
Once the plantlets develop shoots and roots in the lab, transfer them to greenhouse conditions. Using a potting mix of peat and perlite, place them into a closed chamber to maintain proper humidity. Gradually open the chamber lid to let the plant adapt to its new environment.
What is Acclimation?

Acclimatization is the crucial final stage of the tissue culture process. At this point, plants with well-developed shoots and roots are moved from a lab environment to a potting mix, typically made of peat and perlite, within a closed chamber.
This controlled space allows for gradual adjustment to external factors like humidity, ensuring that the plants can adapt without experiencing shock. Since tissue culture plants grow in highly controlled conditions, exposing them too quickly to natural elements such as bright light, fluctuating temperatures, or soil microflora can lead to high mortality rates.
The acclimatization process, also known as hardening, is essential for preparing tissue culture plants to thrive in outdoor environments.
After the multiplication and rooting phases, the plantlets are transferred to a semi-controlled environment, such as a greenhouse. This helps them adjust to variations in air, temperature, light, and exposure to pathogens and pests.
In the lab, tissue culture plants rely on a carbon source and minimal physiological stress, making them ill-equipped for the natural world. Gradually adapting the plants to lower humidity, increased light, and non-sterile conditions—acclimatization—ensures a higher success rate when transitioning them outdoors.
How To Best Acclimate Your Tissue Culture Plants

Acclimating tissue culture plants requires a delicate yet crucial process, as plants must be gradually expose to natural conditions after being grown in controlled environments.
The following is a step-by-step guide for proper acclimatization:
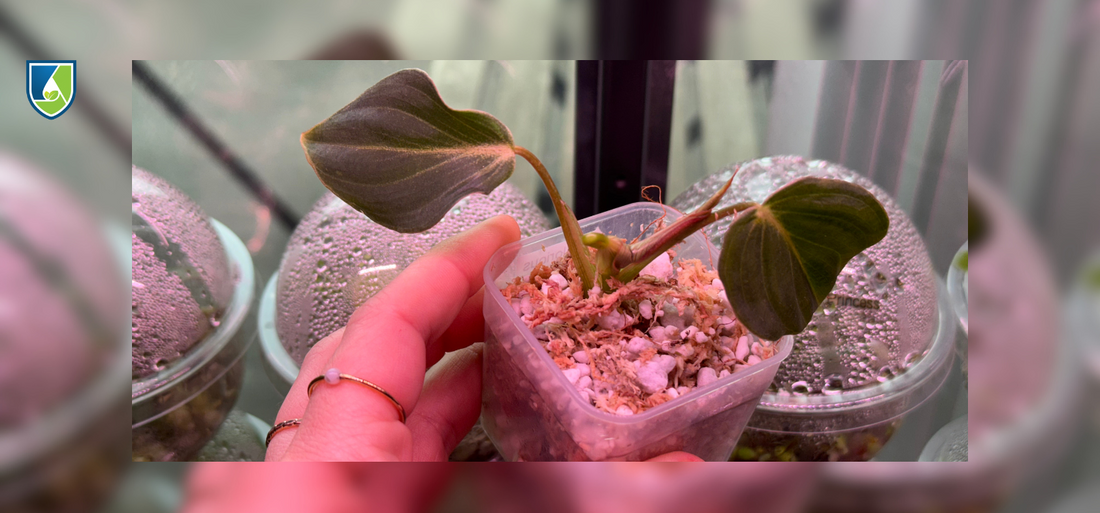
- Clean the Plantlets: Gently remove plantlets from their culture vessels and wash the roots thoroughly to eliminate any residue of sucrose or gel media. This prevents the growth of disease-causing organisms. It's a good idea to trim away any yellow or damaged leaves and immerse the plantlets in a fungicide solution to ward off fungal infections.
- Transfer to a Sterile Medium: Tissue culture plants cannot be directly planted in soil. Choose an appropriate sterile medium like sphagnum moss, perlite, or fluval stratum, depending on the type of plant. Create a small hole, place the roots in it, and cover gently, ensuring that shoots remain above ground. Keep the plant in a transparent container to maintain high humidity and a controlled environment.

- Create a Gradual Transition Environment: Slowly adapt your plants to greenhouse or external conditions by starting with low light intensity and maintaining high humidity. Over the course of several weeks, gradually increase light exposure and reduce humidity levels. Start by opening the container lid for short periods or making small ventilation holes to introduce the plants to a less controlled environment.
- Transfer to Larger Pots: After 4-8 weeks of acclimation, your plant should be strong enough to be moved to a bigger pot or even to regular soil. Continue to monitor for stress and provide ongoing care to ensure a successful transition to the outside environment.

By following these steps, you can ensure that your tissue culture plants adapt smoothly and thrive in their new, less controlled surroundings.
Need Materials, Chemicals, And Equipment For Your Tissue Culture Experiment? Plant Cell Technology Got You Covered!
At Plant Cell Technology, we understand that building and maintaining a successful tissue culture lab requires the right materials, equipment, and chemicals.
Whether you're a seasoned expert or just starting out, ultimately having access to high-quality products is essential because it ensures healthy, thriving plants throughout the tissue culture process—from sterilization and propagation to acclimatization.
With a wide range of top-tier products, including culture vessels, growth media, sterilization agents, and specialized tools, Plant Cell Technology is your one-stop shop for all things tissue culture.

Our experts are here to provide guidance and ensure you have everything you need to conduct successful experiments and achieve optimal results.
Ready to take your tissue culture experiments to the next level? Browse our products today and equip your lab with the best supplies in the industry. We’re here to support you every step of the way!
Explore our catalog and start growing your success with Plant Cell Technology!
Blog Categories
View by Level
Popular Blogs

Preparing Murashige & Skoog (MS) Media: Step by Step Procedure
You must know, of all the media, the Murashige-Skoog (MS) medium is one of the most extensively used in plant...
Read More
A Realistic Look at Nanoparticles in Plant Tissue Culture
What Should You Know: Research demonstrates that nanoparticles provide highly effective applications in contamination control, secondary metabolite elicitation, and targeted...
Read MoreFollow Us On Social


Follow Us On Social
Follow Us On Social
Join the conversation
Your email address will not be published. Required fields are marked